This article is a quick start guide for anyone unfamiliar with DeskManager. It is not meant to be a completely comprehensive document, it is designed to help dealers get acquainted with their new software.
By default when you install DeskManager there is only one user account (MASTER), and there is no password. It is recommended to create a user account for every employee, and to limit access to the MASTER account.
Editing an Existing User
To edit an existing user account start by clicking File > Setup. User Security will automatically be the first option under Setup. Next double click on the user you would like to edit.
Clicking on a menu option on the left pane will bring up permissions related to that section of the program in the middle pane. A checkbox signifies the user is permitted to perform this action. In the example below, the user is now unable to add a new payment.
Adding a New User
To add a new user account start by clicking File > Setup. User Security will automatically be the first option under Setup. Next click New to start the process.
Clicking on a menu option on the left pane will bring up permissions related to that section of the program in the middle pane. A checkbox signifies the user is permitted to perform this action. In the example below, the user is now unable to add a new payment.
On the right side of the window you can input the User Name, Password, and name of the user you’re working on. The only required field is the Username field, though it is recommended to at least add a password. If you want to copy the security settings of another user for the user you’re working with you can choose a user from the Template User dropdown menu.
You will be allowed to assign permissions as soon as you save your new user the first time.
Before getting started, it is recommended to set up your stock numbers and your deal default values. Adjusting these settings can save you a considerable amount of time down the road.
Stock Number Setup
DeskManager will automatically assign a new stock number to your new vehicles. To set up your stock numbers click on File > Setup. From the Setup section expand Inventory Setup and click on Stock Numbers.
If you’d like your stock numbers to adhere to a sequence, enter the next stock number in Next Stock Number. Using a prefix will add numbers and/or letters before your sequential stock number. Using a suffix will add numbers and/or letters after your sequential stock number. You can have both a prefix and a suffix.
DeskManager can also assign the last portion of the vehicle’s VIN as the stock number. You have the option of the last 6, 8, or 10 digits of the VIN.
Once you’ve set your stock numbers, be sure to save your changes.
Deal Default Values
DeskManager will allow you to save deal default values for fees you charge on any new deal. These defaults vary by location, so your default values may not match the ones in the examples below. For questions on the specifics of what to charge, you are recommended to call your local independent dealer association.
To set up your deal default values click on File > Setup. From the Setup section click on Deal Default Values (under Deal).
The example above shows deal default values for California. These values are not accurate to what should actually be charged. Any questions regarding what to charge for deal default values should be referred to your local independent dealer association.
Once you’ve set your deal default values, be sure to save your changes.
Each dealer calculates profit in their own way. In DeskManager, you are able to control how your profits are calculated, as well as your salespeople’s commissions based on the profit. You can set 3 different formulae to calculate your profit figures.
Different Profits
As previously mentioned, DeskManager will factor three individually customizable profits. The differences between those profits can be seen below:
- Front-End Profit - Items that typically go towards your salespeople’s commission.
- Back-End Profit - Items that typically go towards your finance and insurance (F&I) people's commission.
- Gross Profit - Profit before you pay your sales and finance people.
These formulae will determine your profit figures in the Deal/Trade Cap Sheet, Deal/Trade Recap, and your profit reports.
Editing Your Profit Formula
The window below is the Profit Calculations Template window. There are numerous ways to access this template, which are outlined below.

Every profit is figured from the same factors. It is recommended to go line-by-line to determine what part of the deal is factored into which profit(s). Simply double click any line to adjust where that item factors into profit. In the example below, Cash Price will be used to factor Front End profit, but not Back End or Gross.
Applying Your Profit Template
You may set a Profit Template by going to File > Setup > Profit Calculation. This template will apply to all future deals that you create in DeskManager.
Double click an item to choose which profits (if any) you would like to include it in.
Note: There are two options at the bottom of the Profit Calculations Template window. The template will apply to all future deals you enter in DeskManager by default – the first of the two options. If necessary, you may apply the template to all existing deals by selecting the second option.
Adjusting Single Deal Profit
You may also change the profit calculation as it applies to an individual deal.
- Open the deal and click on its recap Tab, then click the Commissions button at the top of the additional information section.
- This will open the Commissions screen for this deal. It is similar to the one you may open from the deal cap screen, but this screen allows the adjustment of profit calculation settings.
- Locate and click the Profit Formula button in the lower-left of this window. Any changes you make to this formula will apply only to this deal.
Note: Costs of operating a business fall outside the scope of DeskManager’s income calculations. From an accounting standpoint, business operating expenses and tax liability are managed after you arrive at your gross profit figure. Sales taxes cannot be subtracted from your gross profit, because doing so would cause your income to be underreported.
The following section provides instructions for creating a backup in DeskManager. Please note that AutoManager, Inc. does not backup any DeskManager data for any clients. It is your responsibility to back your data up. For more information regarding backing up using a third party backup software click here.
To perform a backup from DeskManager click on Tools, then click on Data Backup. You will now see the Backup DeskManager Data Files window. (Please note that DeskManager will ask you to perform a backup every time you close the program. Clicking Yes will also bring you to this window.
First you want to tell DeskManager where to make the backup, which you can do by clicking Browse.
You can now choose the location of your backup. We recommend backing up to a portable drive in case something happens to the computer performing the backup.
You now have a number of backup options to choose from. These options are detailed below: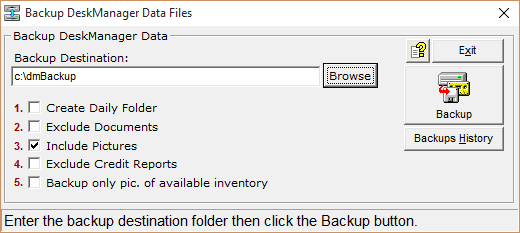
- Create Daily Folder - This creates a different backup folder for each day of the week, Monday through Sunday. If you have an issue with your data on a Tuesday, but don’t catch the problem until Thursday, you will have Monday’s backup to fall back on. Checking this option is highly recommended.
- Exclude Documents - You are able to attach documents (such a PDF and Word documents) in DeskManager for organizational purposes. Checking this checkbox will exclude those documents in your backup.
- Include Pictures - Checking this option will backup all vehicle photos.
- Exclude Credit Reports - Checking this option will prevent previously pulled credit reports from being saved in your backup. The credit check module is an additional module. For more information on pulling credit in DeskManager click here.
- Backup only pic. of available inventory* - This option will only backup photos on your available inventory. This option is only available when you choose to include pictures in your backups.
Once you have selected the desired options for your backup, click Backup to perform the backup. As soon as DeskManager finishes backing up you can click Exit.
From the Inventory tab, click New.
You will now be on the Vehicle Details page. First enter your VIN and click the VIN Chk button. This will generally fill out all the information on this vehicle down to Engine Size. If the VIN doesn’t decode you can always just fill in the information about your vehicle manually. You only need to fill out the rest of the information based on your needs. For example, if you don’t have any reason to keep track of the number of axles on your vehicles, you can leave that field blank.
Once you’ve filled out everything that you need to fill out on this page click Save.
After clicking save you will have access to more buttons and more tabs at the top of the vehicle details window. At this point more people are ready to enter costs onto their vehicles. To get into the costs section simply click on the Costs tab.
The Costs tab is where you can input all the various costs, such as purchase, reconditioning, detail, etc. To
enter a new expense, just click the Enter New Expense button.
This will bring up the Expense Entry screen. From here you can fill out all of the information you need to keep track of in terms of that expense. When you’re done click save to add that expense to the vehicle.
There is no limit to the number of expenses you can add to a car. The bottom right of the costs screen is a detailed breakdown of all the costs associated with this vehicle.
Deals are broken down into 4 status, which are outlined below:
- Worksheet - Worksheets are deals that are still being worked through. You will need both a vehicle and a customer in order to save the deal as something other than a worksheet.
- Pending - Both the vehicle and the customer have been assigned to the vehicle. The terms of the deal may not be finalized yet.
- Retail - This deal is being financed by another lienholder. The terms of the deal has been finalized and locked into place.
- In-House - This is a buy-here-pay-here deal
To start a new deal, click into the Deal/Trade tab, then click New. Please note that there are several other ways to start a new deal.
Enter all charges, fees, and taxes.
DeskManager has a very rich library of forms pre-built into the system. This section will help you to find and print those forms. If the forms you need are not in the system, you can also request them.
Many of the contracts used for the automotive industry are pre-printed, multi-copy contracts. These pre-printed contracts require a dot matrix printer to print all of the information on them. AutoManager’s technical support staff is only trained on a few models of Okidata printers which are listed below:
Okidata Microline 320 Turbo (USB model only)
Okidata Microline 321 Turbo (USB model only)
Okidata Microline 420
Okidata Microline 421
Regardless of model, DeskManager requires you to use the Okidata ML 320 Turbo/D (IBM) driver. The internal settings of the printer must be configured as well. Click here for a video to walk you through these settings.
Please note that AutoManager, Inc. does not track the forms required in your locale. For questions on what forms you should be using, please contact your local independent dealer association.
Finding Your Forms
From inside your deal click on the “Forms” button, then click Library.
Any forms you see in bold on this list are already in your forms list. Use the search box to search find your form.
Please note that there are 4 types of forms you can choose from (Inventory Forms, Local Forms & Contracts, Warranty & Service Contract, and Buyer’s Guides). If you cannot find the form you’re looking for in one section please try the others.
To add a new form to your forms list simply check the checkbox next to the form you would like to add and then click “Save & Continue” at the bottom left of the Forms Library window. When you are done working with your forms, click the “Save & Exit” button.
Printing Forms
From inside your deal click on the “Forms” button.
To print a form, simply double click on that form in your list of forms.
Some forms have additional windows which you can fill additional information into whereas some don’t.
Removing Forms
From inside your deal click on the “Forms” button.
You can also delete forms from here by highlighting the form (one click) you’d like to delete, clicking Manage and then clicking Delete Selected form.
Comments
0 comments
Article is closed for comments.